If you print on bottles made from plastic, glass, or metal, the chances of finding a flat surface are very low. The majority of bottles are curved, slanted, or have a rough surface. More than 90% of printed packaging has 3D surfaces, and not all of them can be printed using the same way.
Screen printing often has problems with accuracy. UV printing can be uneven on non-flat surfaces and is more expensive. Pad printing, on the other hand, gives steady results. It’s widely used by the cosmetics, medical, and special packaging industries due to its accuracy in handling curved, edged, and intricate shapes.
In this article, we’ll look at glass and PET, compare screen printing with pad printing, explain how pad printing works, and show where it works best. If your parts aren’t flat, this information is helpful.
Understanding the Challenges of Printing on 3D Surfaces
Dealing with 3D surfaces requires a different way to treat the surface. For example, if you have worked with glass, plastic, or metal bottles, you are familiar with the problems associated with them. Their surfaces are not flat. They can be narrow, curving, and have texture. As a result, traditional methods become unreliable. With polypropylene or aluminum, you also have problems with ink sticking.
Common 3D Packaging Surfaces
Most of the modern packaging uses:
- Plastics such as PET, HDPE, or PP. They are cheap and light, but have low surface energy, making it hard for the ink to stick.
- Glass. While being smooth and stable makes them easy to work with, their weakness makes them hard to handle, and they need careful pressure.
Metals such as aluminum and stainless steel. While glass and plastics are strong, they are also tough and challenging to work with due to their shine, light-bouncing surface, and issues with ink drying.
Technical Obstacles in 3D Printing
Problems you need to solve when 3D printing:
| Problems | What It Impacts |
|---|---|
| Print surfaces do not stick | Low-energy plastics need treatment like corona or flame |
| Alignment Errors | Curved surfaces can change images, making them look wrong |
| Print Position Moves | Print may shift if bottles roll or move |
| Ink Doesn’t Dry Well | Smearing, fading, or failure can happen if the ink is not fully dried |
| The surface isn’t even | Extra material or raised logos, lines, or textures may cause problems when coating |
However, every system has its weaknesses. If the surface leans too much or curves too much, the alignment fails. Then you know you’re going to see some kind of blur or wrong print. It also struggles with fine details or precise placement. Every change to the design requires a new screen, which adds time, cost, and work to the entire process.
Technology Comparison – Round Bottle Screen Printing vs Pad Printing
If you are involved in printing on bottles, you might have heard of round screen printing and pad printing. Both of them work quite well, but neither of them is perfect. Which one you choose depends on several things in your project: your bottle’s shape, how detailed your design is, and how often you plan to change prints.
Round Bottle Screen Printing
In this method, the bottle is turned, and the screen is placed over it to apply the ink. This method works well for bold, simple prints and is particularly effective on smooth, round bottles. Round bottle screen printing offers full wrap-around coverage and good speed. Think of cleaning products or water bottle brands that have their logo printed in one color.
This method is limited as well. If the bottle is narrow or curves too much, there is likely to be alignment slipping, which can lead to distortion or incorrect prints. Pad printing, in general, is known for struggling with fine details and exact placement. If you want to make a design change, a new screen must be created, which adds time and cost.
Pad Printing
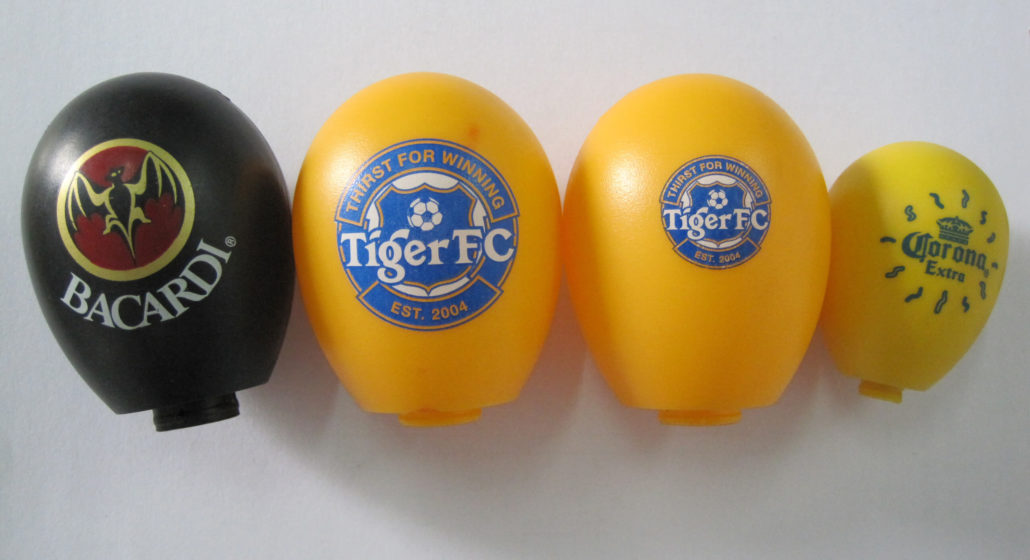
A soft pad picks up the ink from a carved plate and presses it on the bottle. This fixes the problems mentioned before. Since the pad is made of rubber, it bends to match the curves, angles, or even rough surfaces of the bottle. Therefore, printing on the caps, shoulders, or even sunken areas is possible without any distortion.
You can achieve very accurate results with fine text, small logos, or even prints with multiple colors. Setup is quick, design changes are easy, and there is less ink waste.
How Pad Printing Works on Bottles
Bottles can be printed using pad printing, which puts a layer of ink using a silicone pad and a printing plate. It is a clean and fast method that can print on curvy and rough surfaces. This is the suggested method when printing on bottles with uneven surfaces.
The Pad Printing Process – Technical Breakdown
Below is a detailed breakdown of the process, which includes all the steps involved.
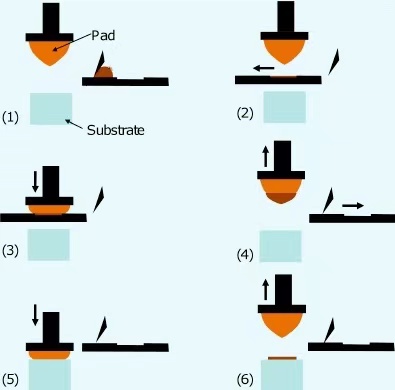
- A printing plate, also called a cliché, is partly filled with the ink of choice.
- An ink cup moves to the printing plate to give a set amount of ink.
- A doctor blade removes the extra ink that is not needed from the etched part.
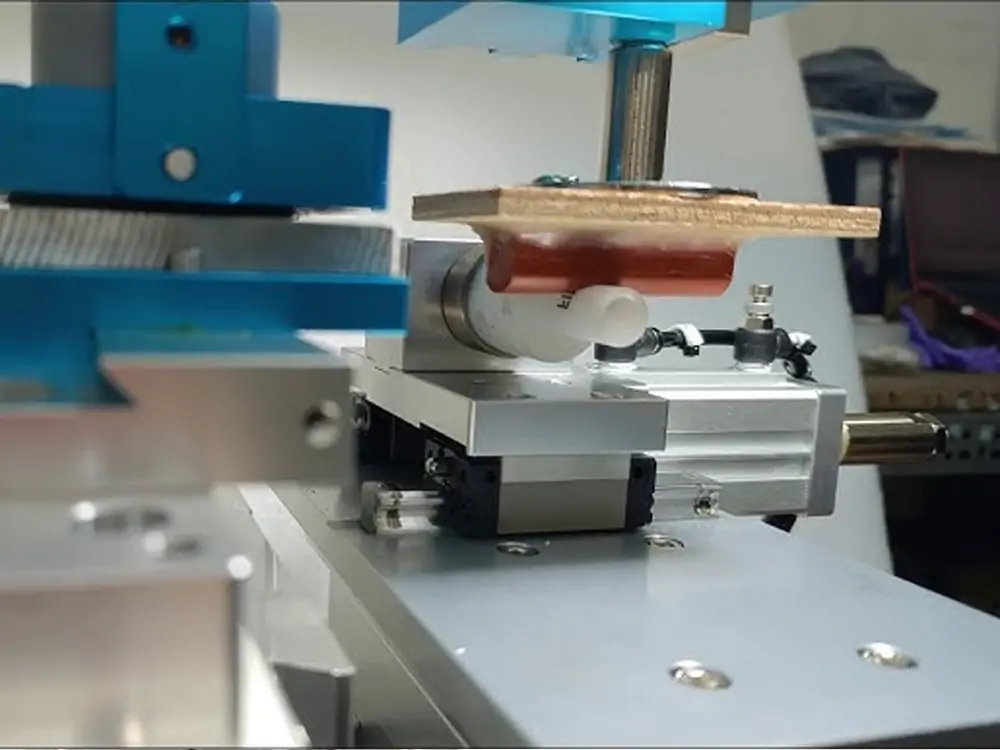
- The plate is brought to the silicone pad, which presses onto the plate to pick up the ink.
- The silicone pad moves to the earlier-mentioned bottle and makes a print using the ink it has picked up.
- The last steps include drying the ink using air, heat, or UV light.
- The entire process takes only a few seconds and can be repeated multiple times.
Key Components
Cliché – The holder of the image is made from plastic or steel, depending on the length of the print job.
Ink cup – It keeps the ink fresh and controls the amount used.
Silicone pad – A tool used for moving the ink that can bend to match the surface of the object.
Bottle fixture – Holds the bottle in place, ensuring every print is lined up correctly
Special Considerations for Cylindrical Bottles
Round bottles need steady upright support. For logos or batch codes, use fixed holders. For printing full-around designs, spin the bottle while pad printing.
Lining things up is very important. Even a minor move can tarnish the image. Adjust the pad pressure, stroke length, and softness of the pad based on the bottle’s width and texture. The result is in your hands.
Why Pad Printing Excels on Plastic, Glass & Metal Bottles
Pad printing can cover what other methods miss. If your bottles have curves, ridges, or tight print areas, this is the way to go. It works well on plastic, glass, and metal — and does it fast and with care.
Superior Surface Conformity
The silicone pad is the key part. It bends and fits around curves, dips, edges, and uneven textures. You can print on the shoulder of a bottle, around a ridge, or on inward surfaces without ruining the image. Screen printing and UV printers can’t do that. Pad printing touches the surface clearly and neatly every time.
Ink Formulation Flexibility
You don’t need to stick to one ink type. Solvent-based inks can be used on plastics like PET and HDPE. Choose UV inks for faster results and 2K epoxy inks for stronger adhesion on metal or glass. When extra adhesion is required, bond helpers or base coats can be applied to enhance the bond. Matching ink to surface and use is simple.
Print Precision and Repeatability
Pad printing excels at printing fine details. Logos, batch and barcode texts, and even small words are printed fast and right. After the initial setup, the machine will repeatedly print the same document without any changes. That’s why the cosmetics and medical packaging industries trust it for clear and essential labeling.
Surface Pretreatment Compatibility
Plastics like PP and glass have low-energy surfaces and often need pretreatment. These still work with pad printing because they can be treated with flame, corona, or plasma. These steps help the ink stick better and last longer. When used with the right inks, prints don’t smudge and resist chemicals and scratching.
What Makes Pad Printing Technically Superior
- Adjusts to Curved Surfaces and Other Textures
- Keeps the Accuracy of Small Detail Printing
- Works with a Range of Special Inks
- Good for Small Print Runs and Product Types
- Better Ink Use Compared to Other Methods
- Lower Rotating Screen Setup Tool Costs
Use Cases – Where Pad Printing Outperforms
When it comes to accuracy and flexibility, few methods can beat Pad Printing. As mentioned earlier, it works best on curved, angled, and rough surfaces. That is truly its strong point.
Industrial Applications
- Print small logos, batch codes, and fine text on medicine bottles and vials.
- Trim and label cosmetic jars and tubes with self-explanatory graphics and branding.
- Marks on electronics, car parts, and control panels where screen printing and laser printing can’t reach.
- Places long-lasting marks on medical tools and lab equipment.
- Promo branded bottles, mugs, and metal flasks are printed with transparent company logos.
Production Scenarios
- Do not need fancy setups for short to medium batch runs.
- Many product versions and designs can be done in minutes by swapping plates.
- Works with hand-operated setups and fully automatic systems.
- High accuracy and fast runs are possible with robot arms and moving tables.
Why OEMs and Private Labelers Prefer It
- Fast logo, language, and product changes.
- Reduced ink waste and lower tool costs make printing more cost-effective.
- Maintains consistent product quality for plastic, glass, and metal bottles.
- Trusted accuracy for small, detailed, and tricky prints with tight placement.
Choosing the Right Pad Printing Machine for Bottles
Key Machine Features
Start with accuracy as your main concern. Check whether the machine you want can easily adjust to different bottle sizes and shapes. Ensure it has pad stroke and pressure settings that can be adjusted. That helps you achieve clean and steady prints, even on curved or textured surfaces. A steady bottle holder is best. If the bottle moves, the print will move too. So, the bottle should be held tightly by the machine.
Choose a closed ink cup system. This will control the ink flow, reduce waste, and maintain cleanliness. If you’re printing in multiple colors, ensure the machine can maintain precise placement between passes. Touchscreen and setup controls are better and faster for printing a wide range of product types. These are best used during setup and when switching jobs.
Integration With Automation
Speed is crucial and can be achieved by automating your steps. Machines that utilize robot arms, moving tables, or belts are more effective. The system should be able to load, print, and unload without stopping. Use camera systems for line-up and to check for any problems. Automation is particularly helpful during large projects or when you need to switch products quickly.
Maintenance and Downtime Considerations
Make it easy. Choose a machine that is easy to clean and maintain. Use quick-change plates, pads, and ink cups. No tools. No problems. Fewer moving parts mean fewer breakdowns. Less downtime improves your line and your results.
Where Other Methods Fall Short
For speed and design changes, there is UV inkjet. But it does not work well on curves and rough surfaces. As soon as you try it on curves, the quality begins to drop quickly.
The hot stamping method is aesthetically pleasing and features a metallic-like finish. However, it is slow, stiff, and doesn’t work well on irregular shapes, only functioning effectively on smooth, flat areas.
Laser etching produces clean and long-lasting marks, but it lacks color. It can’t be used for detailed logos or multi-color brand designs.
Why Pad Printing Wins
With pad printing, control and accuracy are in your hands. It works on curved, slanted, or rough surfaces. It works on plastic, glass, or metal. No problem. It sets up quickly and repeats the same print without error.
If your parts aren’t flat and your prints must be sharp, pad printing always delivers.
Conclusion
Pad printing is the best choice for curved or rough bottles because it bends well without losing placement. It easily handles plastic, glass, and metal. You get sharp detail, exact print alignment, and strong ink sticking, even in hard-to-reach spots.
Other methods struggle with achieving the desired shape, alignment, or lasting results. Pad printing doesn’t. It adjusts quickly, prints with accuracy, and matches your work speed. You can switch designs, print small batches, or run it all by machine.
Don’t waste time on a method not made for 3D surfaces. Use the one that is. If your parts aren’t flat, pad printing is the smartest choice—every time.
Contact us now to choose the top-quality pad printing machine for your business products.